
- Title
-
Microanatomy of adult zebrafish extraocular muscles
- Authors
- Kasprick, D.S., Kish, P.E., Junttila, T.L., Ward, L.A., Bohnsack, B.L., and Kahana, A.
- Source
- Full text @ PLoS One
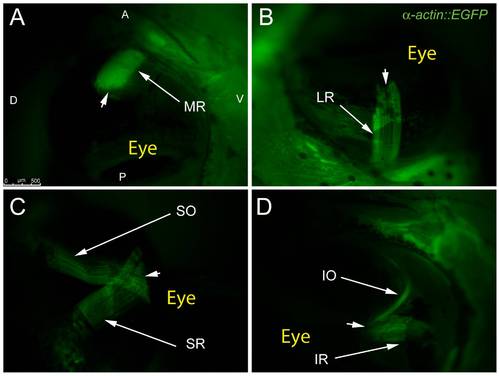
Adult transgenic zebrafish expressing GFP under the control of the α-actin muscle protein promoter allow for clear visualization of all 6 EOMs using epifluorescent stereomicroscopy. The MR and LR (A,B) are shown running parallel to the long axis of the fish and inserting on the anterior and posterior sides of the eye respectively. The SO and SR course from their respective rostral and caudal origin points to insert on the dorsal side of the eye with significant overlap of fibers (C). The IO and IR mirror the SO and SR as they insert onto the ventral side of the eye. Arrowheads mark scleromuscular insertion sites located at the scleral-corneal (SC) junction. Muscle origins are deep within the orbit and are not visible. The anterior (A), posterior (P), dorsal (D), and ventral (V) directions are noted on frame A and apply to frames B–D. |
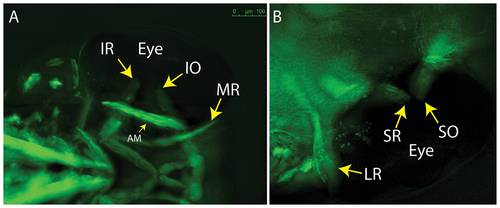
5 dpf embryos showing lack of overlap for SR/SO and IR/IO at their insertion sites (arrows). (A) ventral; (B) dorsal. Images reflect maximum projections following deconvolution of macroscopic Z-stacks. IR = inferior rectus; IO = inferior oblique; MR = medial rectus; AM = adductor mandibulae (jaw muscle – thin arrow); LR = lateral rectus; SR = superior rectus; SO = superior oblique. |

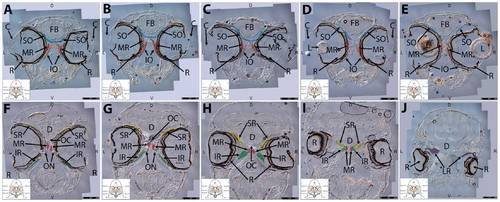
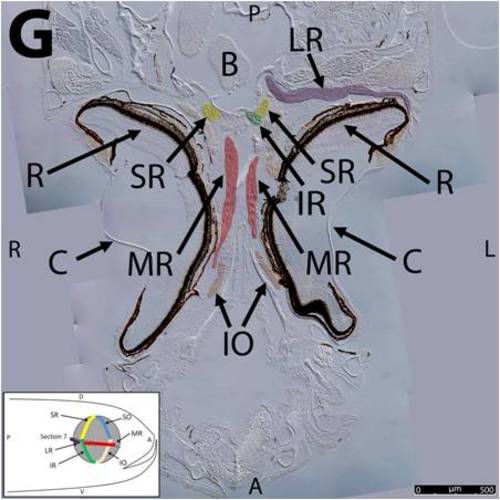
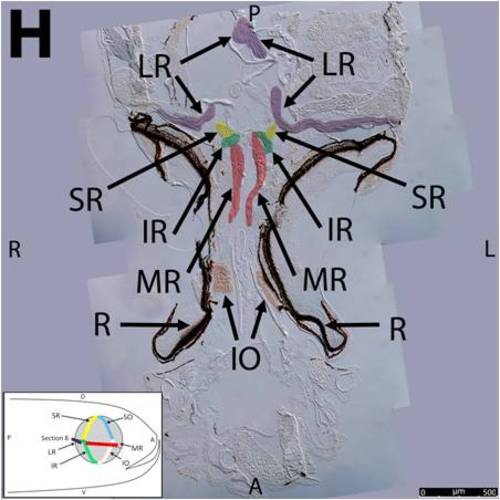
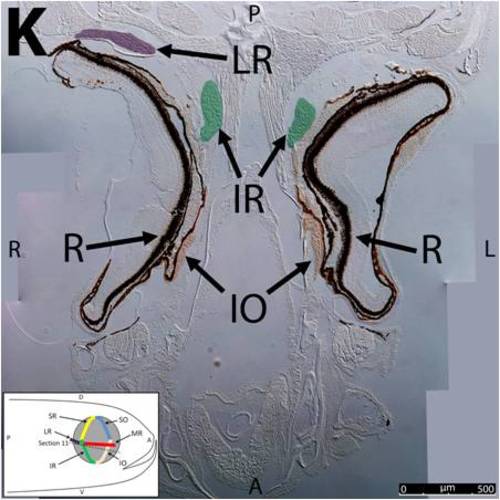
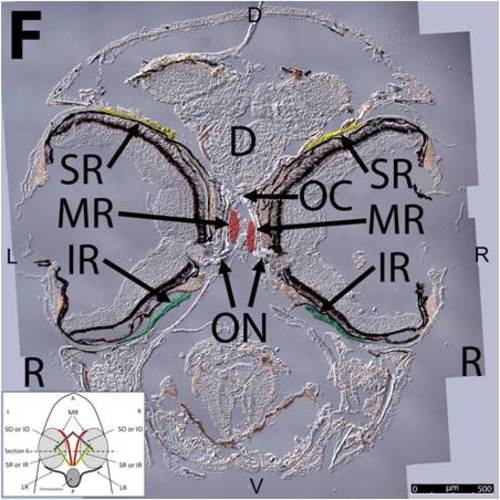
Key anatomical features within the WT adult zebrafish orbit are highlighted on 12 μm thick coronal sections originally imaged at 200X magnification with DIC prisms to reveal topographical tissue architecture. Sections proceed in the dorsal (4A) to ventral (4L) direction and show all 6 muscles extending from origin to globe insertion. Please refer to the text for further details. Specific EOMs can be observed on the following figures: Superior oblique (4A–4D). Superior rectus (4A–4J). Inferior Oblique (4C–4L). Inferior rectus (4G–4L). Medial rectus (4E–4J). Lateral rectus (4G–4K). Anterior (A), posterior (P), left (L), and right (R) directions are noted on each frame and a schematic illustrating the specific plane of section is located in the lower left corner. Key features are labeled as follows: B – brain, C – cornea, IO – inferior oblique, IR – inferior rectus, LR – lateral rectus, L – lens, MR – medial rectus, ON – optic nerve, SO – superior oblique, SR – superior rectus, R – retina. For larger versions of the images, please refer to supplemental figures 1A-1L. |
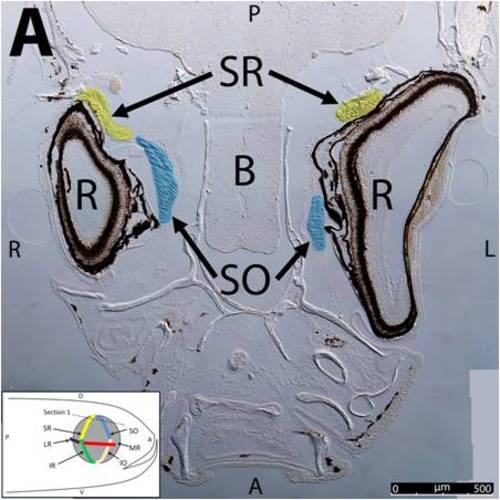
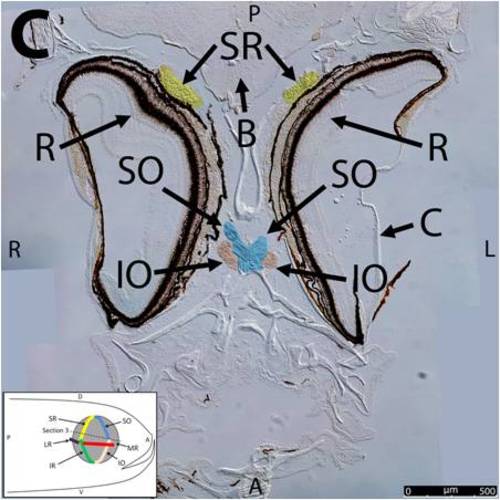
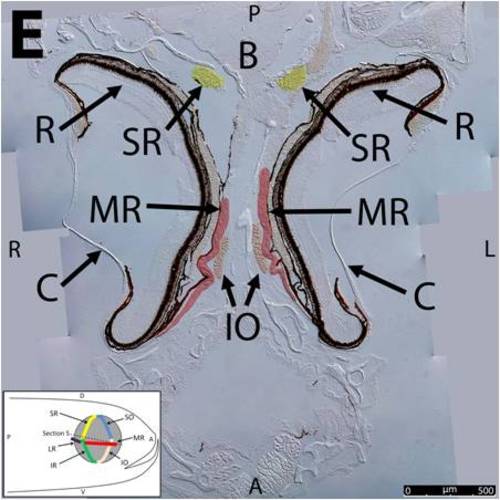
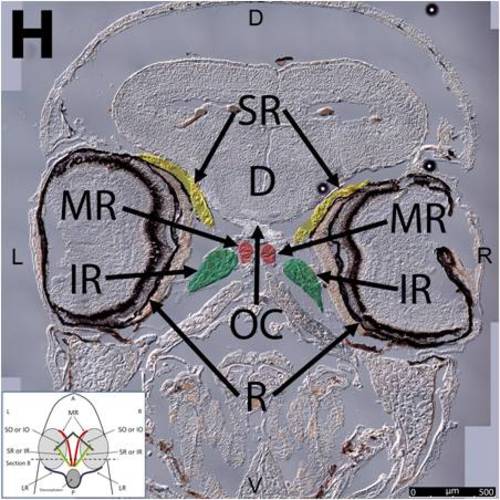
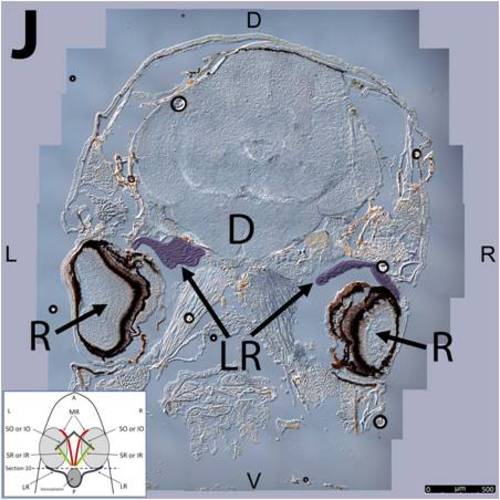
Key anatomical features within the WT adult zebrafish orbit are highlighted on 12 μm thick transverse sections originally imaged at 200X magnification with DIC prisms to reveal topographical tissue architecture. Sections proceed in the rostral (5A) to caudal (5J) direction and show all 6 muscles extending from origin to globe insertion. Please refer to the text for further details. Specific EOMs can be observed on the following figures. Superior and inferior oblique (5A–5E). Superior and inferior rectus (5F–5I). Medial rectus (5A–5I). Dorsal (D), ventral (V), left (L), and right (R) directions are noted on each frame and a schematic illustrating the specific plane of section is located in the lower left corner. Key features are labeled as follows: C – cornea, D – diencephalon, FB – forebrain, IO – inferior oblique, IR – inferior rectus, LR – lateral rectus, L – lens, MR – medial rectus, OC – optic chiasm, ON – optic nerve, SO – superior oblique, SR – superior rectus, R – retina. For larger versions of the images, please refer to supplemental figures 2A-1J. |

Fluorescent immunohistochemistry reveals uniform distribution of laminin throughout mid-muscle myocyte basement membranes. DIC imaging shows SO cut in mid-muscle cross section sandwiched between the globe and orbital bone with myocyte diameter increasing in the posterior to anterior direction (A). Laminin (red) is evenly distributed within basement membranes of individual myocytes throughout the entire muscle in cross section (B). Peripherally located nuclei, characteristic of muscle, are highlighted in blue. The anterior (A) and posterior (P) directions are noted in Frame B. Images were captured with a 20x objective lens. Red = Laminin; Blue = Nuclei. |

Fluorescent immunohistochemistry highlights laminin localization at the MR, SR, and IR origin site. DIC imaging reveals MR, SR, and IR from the left and right eye meeting at two common origin points with EOM tendons marked by asterisk (A). Fluorescent overlay shows laminin (red) evenly distributed throughout basement membranes of individual myocytes from all six muscles. Laminin appears to distribute evenly throughout EOM tendon and along the edge of bone as well (B). Anterior (A) and posterior (P) directions are noted (Frame A). Image tiles were captured with a 40x objective lens and merged into mosaics. |
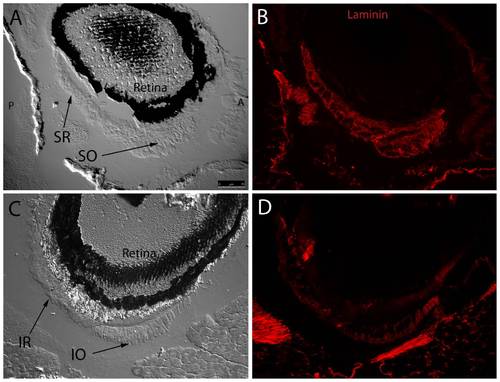
Fluorescent immunohistochemistry reveals an even distribution of laminin throughout myocyte basement membranes at the SR/SO and IR/IO insertion sites. DIC images show SR and SO overlapping near their globe insertion site on the superior side of the eye and IR and IO in a similar arrangement on the inferior side of the eye (A,C). Fluorescent overlays highlight uniform laminin (red) distribution throughout basement membranes of individual myocytes (B,D). Broader areas of laminin expression surrounding the muscle represent either broad laminin expression throughout a myotendinous junction or simply myocyte basement membrane cut in perfectly tangential section. Images were captured with a 20x objective lens. |

Fluorescent immunohistochemistry shows thbs-4 enrichment in EOM origin tendons. Low magnification (20x objective) DIC image (A) displays pairs of MR, SR, and IR converging at their common origin points with fluorescent thbs-4 (red) overlay (B) and fluorescent/DIC merged image (C). High magnification (63x) DIC images (D,G) show SR, IR, and MR attaching to bone with MR tendons (*) and IR tendons (arrows) marked. IR tendons marked with thbs-4 (E,F,H,I) are observed sandwiched at the furthest proximal point of the IR bordered by the MR and SR on either side. Thbs-4 is expressed in MR tendons (*) at their most proximal point as they insert on bone at their origin. |

Fluorescent immunohistochemistry indicates that thrombospondin-4 (thbs-4) localizes to basement membranes of small diameter EOM myocytes. SR and SO are shown in transverse cross section (A,B – DIC). Thbs-4 (red) localizes to the basement membrane of smaller diameter myocytes and progressively decreases until becoming absent from large diameter myocyte basement membranes (C,D). Smaller diameter fibers appear to be more highly innervated as the density of α-BTX labeled NMJs (green) is greatest in the small diameter myocyte, thbs-4 expressing zone. Images were originally captured with a 40x objective lens and merged together to form mosaics. |

NMJ post-synapses labeled with α-BTX (green) reveal even distribution from EOM origin to insertion. DIC images display full length LR and MR in longitudinal section from origin to insertion (A,C). NMJs (green) labeled with fluorescently conjugated α-BTX are distributed throughout both muscles from origin to insertion and do not appear to be organized into any particular longitudinal pattern across EOM (C,D). Nuclei are stained blue with Hoechst nuclear stain throughout. Mosaics were originally captured using a 63x objective lens. |
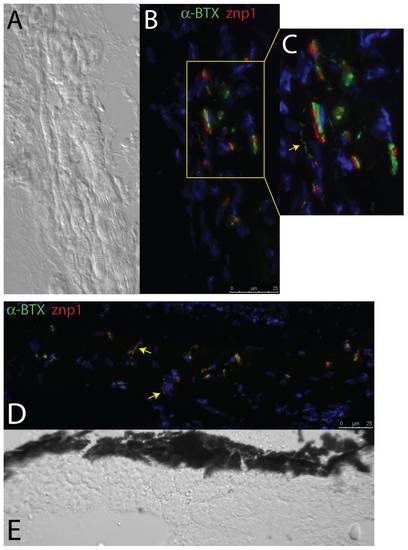
Zebrafish EOMs contain both en plaque and en grappe NMJs. (A) DIC and (B) immunofluorescence (IF) images of NMJs in longitudinally sectioned EOMs double stained with both pre- and post-synpatic markers (znp1 and α-BTX), revealing under high-magnification (C) the presence of both en plaque and en grappe (arrow) junctions, the former more numerous than the latter. Transverse sections (IF, D, and DIC, E) also reveal the presence of en grappe junctions (arrows), with palisading fibers. Red = Synaptotagmin/znp1; Green = α-BTX. |
Key anatomical features within the WT adult zebrafish orbit are highlighted on 12 μm thick coronal sections originally imaged using 200X magnification with DIC prisms to show topographical tissue architecture. Sections proceed in the dorsal (S1) to ventral (S12) direction and show all 6 muscles extending from origin to globe insertion. A detailed analysis of the anatomy can be found in the “Results” section of this paper. For easy reference, specific EOMs can be observed on the following figures. Superior oblique (S1–S4). Superior rectus (S1–S10). Inferior Oblique (S3–S12). Inferior rectus (S7–S12). Medial rectus (S5–S10). Lateral rectus (S7–S11). Anterior (A), posterior (P), left (L), and right (R) directions are noted on each frame and a schematic illustrating the specific plane of section is located in the lower left corner. |

Key anatomical features within the WT adult zebrafish orbit are highlighted on 12 μm thick coronal sections originally imaged using 200X magnification with DIC prisms to show topographical tissue architecture. Sections proceed in the dorsal (S1) to ventral (S12) direction and show all 6 muscles extending from origin to globe insertion. A detailed analysis of the anatomy can be found in the “Results” section of this paper. For easy reference, specific EOMs can be observed on the following figures. Superior oblique (S1–S4). Superior rectus (S1–S10). Inferior Oblique (S3–S12). Inferior rectus (S7–S12). Medial rectus (S5–S10). Lateral rectus (S7–S11). Anterior (A), posterior (P), left (L), and right (R) directions are noted on each frame and a schematic illustrating the specific plane of section is located in the lower left corner. |
Key anatomical features within the WT adult zebrafish orbit are highlighted on 12µm thick coronal sections originally imaged using 200X magnification with DIC prisms to show topographical tissue architecture. Sections proceed in the dorsal (S1) to ventral (S12) direction and show all 6 muscles extending from origin to globe insertion. A detailed analysis of the anatomy can be found in the “Results” section of this paper. For easy reference, specific EOMs can be observed on the following figures. Superior oblique (S1–S4). Superior rectus (S1–S10). Inferior Oblique (S3–S12). Inferior rectus (S7–S12). Medial rectus (S5–S10). Lateral rectus (S7–S11). Anterior (A), posterior (P), left (L), and right (R) directions are noted on each frame and a schematic illustrating the specific plane of section is located in the lower left corner. |

Key anatomical features within the WT adult zebrafish orbit are highlighted on 12µm thick coronal sections originally imaged using 200X magnification with DIC prisms to show topographical tissue architecture. Sections proceed in the dorsal (S1) to ventral (S12) direction and show all 6 muscles extending from origin to globe insertion. A detailed analysis of the anatomy can be found in the “Results” section of this paper. For easy reference, specific EOMs can be observed on the following figures. Superior oblique (S1–S4). Superior rectus (S1–S10). Inferior Oblique (S3–S12). Inferior rectus (S7–S12). Medial rectus (S5–S10). Lateral rectus (S7–S11). Anterior (A), posterior (P), left (L), and right (R) directions are noted on each frame and a schematic illustrating the specific plane of section is located in the lower left corner. |
Key anatomical features within the WT adult zebrafish orbit are highlighted on 12µm thick coronal sections originally imaged using 200X magnification with DIC prisms to show topographical tissue architecture. Sections proceed in the dorsal (S1) to ventral (S12) direction and show all 6 muscles extending from origin to globe insertion. A detailed analysis of the anatomy can be found in the “Results” section of this paper. For easy reference, specific EOMs can be observed on the following figures. Superior oblique (S1–S4). Superior rectus (S1–S10). Inferior Oblique (S3–S12). Inferior rectus (S7–S12). Medial rectus (S5–S10). Lateral rectus (S7–S11). Anterior (A), posterior (P), left (L), and right (R) directions are noted on each frame and a schematic illustrating the specific plane of section is located in the lower left corner. |

Key anatomical features within the WT adult zebrafish orbit are highlighted on 12µm thick coronal sections originally imaged using 200X magnification with DIC prisms to show topographical tissue architecture. Sections proceed in the dorsal (S1) to ventral (S12) direction and show all 6 muscles extending from origin to globe insertion. A detailed analysis of the anatomy can be found in the “Results” section of this paper. For easy reference, specific EOMs can be observed on the following figures. Superior oblique (S1–S4). Superior rectus (S1–S10). Inferior Oblique (S3–S12). Inferior rectus (S7–S12). Medial rectus (S5–S10). Lateral rectus (S7–S11). Anterior (A), posterior (P), left (L), and right (R) directions are noted on each frame and a schematic illustrating the specific plane of section is located in the lower left corner. |
Key anatomical features within the WT adult zebrafish orbit are highlighted on 12µm thick coronal sections originally imaged using 200X magnification with DIC prisms to show topographical tissue architecture. Sections proceed in the dorsal (S1) to ventral (S12) direction and show all 6 muscles extending from origin to globe insertion. A detailed analysis of the anatomy can be found in the “Results” section of this paper. For easy reference, specific EOMs can be observed on the following figures. Superior oblique (S1–S4). Superior rectus (S1–S10). Inferior Oblique (S3–S12). Inferior rectus (S7–S12). Medial rectus (S5–S10). Lateral rectus (S7–S11). Anterior (A), posterior (P), left (L), and right (R) directions are noted on each frame and a schematic illustrating the specific plane of section is located in the lower left corner. |
Key anatomical features within the WT adult zebrafish orbit are highlighted on 12µm thick coronal sections originally imaged using 200X magnification with DIC prisms to show topographical tissue architecture. Sections proceed in the dorsal (S1) to ventral (S12) direction and show all 6 muscles extending from origin to globe insertion. A detailed analysis of the anatomy can be found in the “Results” section of this paper. For easy reference, specific EOMs can be observed on the following figures. Superior oblique (S1–S4). Superior rectus (S1–S10). Inferior Oblique (S3–S12). Inferior rectus (S7–S12). Medial rectus (S5–S10). Lateral rectus (S7–S11). Anterior (A), posterior (P), left (L), and right (R) directions are noted on each frame and a schematic illustrating the specific plane of section is located in the lower left corner. |

Key anatomical features within the WT adult zebrafish orbit are highlighted on 12µm thick coronal sections originally imaged using 200X magnification with DIC prisms to show topographical tissue architecture. Sections proceed in the dorsal (S1) to ventral (S12) direction and show all 6 muscles extending from origin to globe insertion. A detailed analysis of the anatomy can be found in the “Results” section of this paper. For easy reference, specific EOMs can be observed on the following figures. Superior oblique (S1–S4). Superior rectus (S1–S10). Inferior Oblique (S3–S12). Inferior rectus (S7–S12). Medial rectus (S5–S10). Lateral rectus (S7–S11). Anterior (A), posterior (P), left (L), and right (R) directions are noted on each frame and a schematic illustrating the specific plane of section is located in the lower left corner. |

Key anatomical features within the WT adult zebrafish orbit are highlighted on 12µm thick coronal sections originally imaged using 200X magnification with DIC prisms to show topographical tissue architecture. Sections proceed in the dorsal (S1) to ventral (S12) direction and show all 6 muscles extending from origin to globe insertion. A detailed analysis of the anatomy can be found in the “Results” section of this paper. For easy reference, specific EOMs can be observed on the following figures. Superior oblique (S1–S4). Superior rectus (S1–S10). Inferior Oblique (S3–S12). Inferior rectus (S7–S12). Medial rectus (S5–S10). Lateral rectus (S7–S11). Anterior (A), posterior (P), left (L), and right (R) directions are noted on each frame and a schematic illustrating the specific plane of section is located in the lower left corner. |
Key anatomical features within the WT adult zebrafish orbit are highlighted on 12µm thick coronal sections originally imaged using 200X magnification with DIC prisms to show topographical tissue architecture. Sections proceed in the dorsal (S1) to ventral (S12) direction and show all 6 muscles extending from origin to globe insertion. A detailed analysis of the anatomy can be found in the “Results” section of this paper. For easy reference, specific EOMs can be observed on the following figures. Superior oblique (S1–S4). Superior rectus (S1–S10). Inferior Oblique (S3–S12). Inferior rectus (S7–S12). Medial rectus (S5–S10). Lateral rectus (S7–S11). Anterior (A), posterior (P), left (L), and right (R) directions are noted on each frame and a schematic illustrating the specific plane of section is located in the lower left corner. |

Key anatomical features within the WT adult zebrafish orbit are highlighted on 12µm thick coronal sections originally imaged using 200X magnification with DIC prisms to show topographical tissue architecture. Sections proceed in the dorsal (S1) to ventral (S12) direction and show all 6 muscles extending from origin to globe insertion. A detailed analysis of the anatomy can be found in the “Results” section of this paper. For easy reference, specific EOMs can be observed on the following figures. Superior oblique (S1–S4). Superior rectus (S1–S10). Inferior Oblique (S3–S12). Inferior rectus (S7–S12). Medial rectus (S5–S10). Lateral rectus (S7–S11). Anterior (A), posterior (P), left (L), and right (R) directions are noted on each frame and a schematic illustrating the specific plane of section is located in the lower left corner. |

Key anatomical features within the WT adult zebrafish orbit are highlighted on 12µm thick coronal sections originally imaged using 200X magnification with DIC prisms to show topographical tissue architecture. Sections proceed in the dorsal (S1) to ventral (S12) direction and show all 6 muscles extending from origin to globe insertion. A detailed analysis of the anatomy can be found in the “Results” section of this paper. For easy reference, specific EOMs can be observed on the following figures. Superior oblique (S1–S4). Superior rectus (S1–S10). Inferior Oblique (S3–S12). Inferior rectus (S7–S12). Medial rectus (S5–S10). Lateral rectus (S7–S11). Anterior (A), posterior (P), left (L), and right (R) directions are noted on each frame and a schematic illustrating the specific plane of section is located in the lower left corner. |

Key anatomical features within the WT adult zebrafish orbit are highlighted on 12µm thick coronal sections originally imaged using 200X magnification with DIC prisms to show topographical tissue architecture. Sections proceed in the dorsal (S1) to ventral (S12) direction and show all 6 muscles extending from origin to globe insertion. A detailed analysis of the anatomy can be found in the “Results” section of this paper. For easy reference, specific EOMs can be observed on the following figures. Superior oblique (S1–S4). Superior rectus (S1–S10). Inferior Oblique (S3–S12). Inferior rectus (S7–S12). Medial rectus (S5–S10). Lateral rectus (S7–S11). Anterior (A), posterior (P), left (L), and right (R) directions are noted on each frame and a schematic illustrating the specific plane of section is located in the lower left corner. |

Key anatomical features within the WT adult zebrafish orbit are highlighted on 12µm thick coronal sections originally imaged using 200X magnification with DIC prisms to show topographical tissue architecture. Sections proceed in the dorsal (S1) to ventral (S12) direction and show all 6 muscles extending from origin to globe insertion. A detailed analysis of the anatomy can be found in the “Results” section of this paper. For easy reference, specific EOMs can be observed on the following figures. Superior oblique (S1–S4). Superior rectus (S1–S10). Inferior Oblique (S3–S12). Inferior rectus (S7–S12). Medial rectus (S5–S10). Lateral rectus (S7–S11). Anterior (A), posterior (P), left (L), and right (R) directions are noted on each frame and a schematic illustrating the specific plane of section is located in the lower left corner. |

Key anatomical features within the WT adult zebrafish orbit are highlighted on 12µm thick coronal sections originally imaged using 200X magnification with DIC prisms to show topographical tissue architecture. Sections proceed in the dorsal (S1) to ventral (S12) direction and show all 6 muscles extending from origin to globe insertion. A detailed analysis of the anatomy can be found in the “Results” section of this paper. For easy reference, specific EOMs can be observed on the following figures. Superior oblique (S1–S4). Superior rectus (S1–S10). Inferior Oblique (S3–S12). Inferior rectus (S7–S12). Medial rectus (S5–S10). Lateral rectus (S7–S11). Anterior (A), posterior (P), left (L), and right (R) directions are noted on each frame and a schematic illustrating the specific plane of section is located in the lower left corner. |

Key anatomical features within the WT adult zebrafish orbit are highlighted on 12µm thick coronal sections originally imaged using 200X magnification with DIC prisms to show topographical tissue architecture. Sections proceed in the dorsal (S1) to ventral (S12) direction and show all 6 muscles extending from origin to globe insertion. A detailed analysis of the anatomy can be found in the “Results” section of this paper. For easy reference, specific EOMs can be observed on the following figures. Superior oblique (S1–S4). Superior rectus (S1–S10). Inferior Oblique (S3–S12). Inferior rectus (S7–S12). Medial rectus (S5–S10). Lateral rectus (S7–S11). Anterior (A), posterior (P), left (L), and right (R) directions are noted on each frame and a schematic illustrating the specific plane of section is located in the lower left corner. |
Key anatomical features within the WT adult zebrafish orbit are highlighted on 12µm thick coronal sections originally imaged using 200X magnification with DIC prisms to show topographical tissue architecture. Sections proceed in the dorsal (S1) to ventral (S12) direction and show all 6 muscles extending from origin to globe insertion. A detailed analysis of the anatomy can be found in the “Results” section of this paper. For easy reference, specific EOMs can be observed on the following figures. Superior oblique (S1–S4). Superior rectus (S1–S10). Inferior Oblique (S3–S12). Inferior rectus (S7–S12). Medial rectus (S5–S10). Lateral rectus (S7–S11). Anterior (A), posterior (P), left (L), and right (R) directions are noted on each frame and a schematic illustrating the specific plane of section is located in the lower left corner. |

Key anatomical features within the WT adult zebrafish orbit are highlighted on 12µm thick coronal sections originally imaged using 200X magnification with DIC prisms to show topographical tissue architecture. Sections proceed in the dorsal (S1) to ventral (S12) direction and show all 6 muscles extending from origin to globe insertion. A detailed analysis of the anatomy can be found in the “Results” section of this paper. For easy reference, specific EOMs can be observed on the following figures. Superior oblique (S1–S4). Superior rectus (S1–S10). Inferior Oblique (S3–S12). Inferior rectus (S7–S12). Medial rectus (S5–S10). Lateral rectus (S7–S11). Anterior (A), posterior (P), left (L), and right (R) directions are noted on each frame and a schematic illustrating the specific plane of section is located in the lower left corner. |
Key anatomical features within the WT adult zebrafish orbit are highlighted on 12µm thick coronal sections originally imaged using 200X magnification with DIC prisms to show topographical tissue architecture. Sections proceed in the dorsal (S1) to ventral (S12) direction and show all 6 muscles extending from origin to globe insertion. A detailed analysis of the anatomy can be found in the “Results” section of this paper. For easy reference, specific EOMs can be observed on the following figures. Superior oblique (S1–S4). Superior rectus (S1–S10). Inferior Oblique (S3–S12). Inferior rectus (S7–S12). Medial rectus (S5–S10). Lateral rectus (S7–S11). Anterior (A), posterior (P), left (L), and right (R) directions are noted on each frame and a schematic illustrating the specific plane of section is located in the lower left corner. |

Key anatomical features within the WT adult zebrafish orbit are highlighted on 12µm thick coronal sections originally imaged using 200X magnification with DIC prisms to show topographical tissue architecture. Sections proceed in the dorsal (S1) to ventral (S12) direction and show all 6 muscles extending from origin to globe insertion. A detailed analysis of the anatomy can be found in the “Results” section of this paper. For easy reference, specific EOMs can be observed on the following figures. Superior oblique (S1–S4). Superior rectus (S1–S10). Inferior Oblique (S3–S12). Inferior rectus (S7–S12). Medial rectus (S5–S10). Lateral rectus (S7–S11). Anterior (A), posterior (P), left (L), and right (R) directions are noted on each frame and a schematic illustrating the specific plane of section is located in the lower left corner. |
Key anatomical features within the WT adult zebrafish orbit are highlighted on 12µm thick coronal sections originally imaged using 200X magnification with DIC prisms to show topographical tissue architecture. Sections proceed in the dorsal (S1) to ventral (S12) direction and show all 6 muscles extending from origin to globe insertion. A detailed analysis of the anatomy can be found in the “Results” section of this paper. For easy reference, specific EOMs can be observed on the following figures. Superior oblique (S1–S4). Superior rectus (S1–S10). Inferior Oblique (S3–S12). Inferior rectus (S7–S12). Medial rectus (S5–S10). Lateral rectus (S7–S11). Anterior (A), posterior (P), left (L), and right (R) directions are noted on each frame and a schematic illustrating the specific plane of section is located in the lower left corner. |